Installing an HSZ80 Array Controller
Order Number: EK-Z8CTL-IN
This document outlines the procedures for replacing an HSZ80 Array Controller in two main configurations: dual-redundant and single controller.
General Safety and Prerequisites:
- Always wear an Electrostatic Discharge (ESD) wrist strap connected to a verified earth ground to prevent damage.
- A terminal connection to the operational controller's maintenance port is often required.
1. Replacing a Controller in a Dual-Redundant Configuration:
Removal Process:
- Connect a terminal to the operational controller.
- Disable failover using
SET NOFAILOVER. - Run the
RUN FRUTILutility. - Navigate FRUTIL menus to choose "Replace or remove a controller or cache module," then "Other controller module" to target the controller being removed.
- Confirm removal and wait for FRUTIL to quiesce device ports.
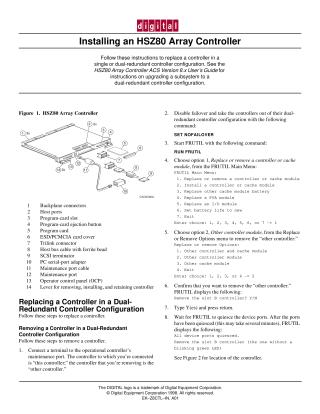
- Remove the ESD cover and program card (save for the new controller).
- Disconnect trilink connectors (but not bus cables).
- Disengage retaining levers and physically remove the controller, placing it in an antistatic bag. FRUTIL will prompt if you have a replacement.
Installation Process:
- If proceeding directly from removal, FRUTIL may continue the process. Otherwise, connect terminal and run
RUN FRUTIL. - Navigate FRUTIL menus to "Install a controller or cache module," then "Other controller module" for the new controller.
- Confirm installation and wait for FRUTIL to quiesce device ports.
- Insert the new controller (without its program card initially) and engage retaining levers.
- Connect trilink connectors.
- Hold the reset button while inserting the program card, then release the button and replace the ESD cover.
- Note: If the new controller was previously used, its old configuration may need to be purged.
- If proceeding directly from removal, FRUTIL may continue the process. Otherwise, connect terminal and run
2. Replacing a Controller in a Single Controller Configuration:
Removal Process:
- Dismount logical units from the host (and shut down PC if Windows NT).
- Connect a terminal to the controller's maintenance port (if operating).
- Optionally run FMU for failure codes.
- If operating, shut down the controller using
SHUTDOWN THIS_CONTROLLER(be aware of potential cache data loss). - Turn off power to the subsystem.
- Remove the ESD cover and program card (save for the new controller).
- Disconnect trilink connectors (but not bus cables) and the terminal.
- Disengage retaining levers and physically remove the controller, placing it in an antistatic bag.
Installation Process:
- Insert the new controller and engage retaining levers.
- Connect trilink connectors and the terminal to the maintenance port.
- Restore power to the subsystem.
- Hold the reset button while inserting the program card, then release the button and replace the ESD cover.
- Note: If the controller was previously used, purge its old configuration using
SET THIS_CONTROLLER INITIAL_CONFIGURATION. - Install any necessary patches using CLCP.
- Mount logical units on the host (restart PC if Windows NT).
- Set the subsystem date and time.
Site structure and layout ©2025 Majenko Technologies