DIGITAL StorageWorks Ultra SCSI Cables (BN37A-Series) Installation Guide
Order Number: EK-BN37A-IG
This document provides instructions for the removal and installation of Ultra SCSI cables (BN37A-series) for DIGITAL StorageWorks RAID subsystems.
Key Procedures:
Turning Off the Subsystem (Crucial Pre-requisite):
- Always shut down the subsystem completely before removing or installing cables to prevent data corruption.
- This involves dismounting storage devices, connecting a maintenance terminal, shutting down both primary and redundant controllers, and finally turning off AC power to all enclosures.
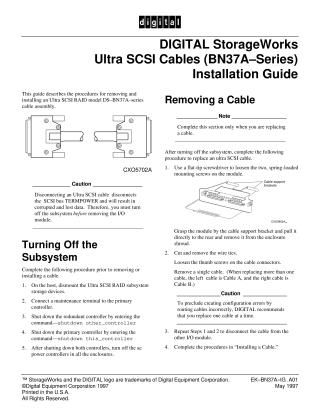
Removing a Cable:
- After the subsystem is off, loosen the spring-loaded mounting screws on the I/O module and pull it out.
- Cut any wire ties and loosen thumb screws to detach the cable.
- Important: To prevent configuration errors, DIGITAL recommends replacing one cable at a time.
- Repeat the process for cables connected to the other I/O module.
Installing a Cable:
- Remove the new cable from its electrostatic bag and verify the model.
- Align the cable connector with the module, insert gently, and tighten the thumb screws.
- Secure the cable to the support bracket using a wire tie.
- Repeat this process for all necessary cable connections (Cable A, then Cable B, connecting to both I/O modules).
- Install both I/O modules back into the enclosure, aligning them with the card guides and firmly seating them. Tighten the mounting screws, but do not overtighten.
- Repeat these procedures for each cable being installed.
Turning On the Subsystem:
- After all cables are installed, restore AC power to each enclosure.
- Reset both the primary and redundant controllers (press and hold the Reset switch for at least 3 seconds).
- Verify that both controllers are functioning correctly using the
show other_controllercommand from a maintenance terminal. - Finally, check the entire subsystem for proper operation.
Site structure and layout ©2025 Majenko Technologies