KN7AA CPU INSTALLATION CARD
Order Number: EK-KN7AA-IN
This document serves as a quick reference guide for installing a KN7AA CPU module (E2040) into DEC 7000 or 10000 systems.
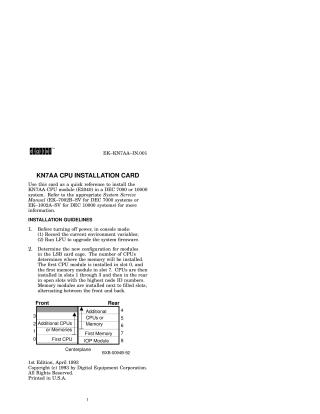
The installation process begins with pre-installation guidelines, including recording current environment variables and upgrading system firmware on existing modules using the Loadable Firmware Update (LFU) utility. It also outlines the module placement strategy within the LSB card cage, detailing slots for the first CPU (slot 0), first memory (slot 7), and subsequent additional CPUs, memory, or IOP modules.
The physical installation involves turning off system power, opening the cabinet, wearing an antistatic wrist strap, preparing the LSB card cage by removing its cover and any filler modules, and then carefully inserting the KN7AA CPU module into its designated slot. The module is guided into place, secured with restraining clips and metal tabs, and the card cage cover and cabinet doors are closed.
Post-installation steps are crucial for system verification and configuration. Users must power up the system and check the self-test display to confirm the recognition of new modules, verifying the firmware revision level. If a firmware mismatch occurs, LFU needs to be rerun to update new CPUs and EEPROMs rebuilt, followed by saving the new system configuration using the set configuration command.
Finally, each new CPU requires specific information storage: copying environment variables from the primary processor using update -e kn7aa*, connecting the console to the new CPU with set cpu n, and then entering the system serial number (set eeprom serial) and service details (LARS number and message) into its EEPROM using set eeprom field.
Site structure and layout ©2025 Majenko Technologies