Memory Option Installation Card
Order Number: EK-DS10M-IN
This document provides a quick reference guide for installing 3X-MS310-XX memory options (DIMMs) in Compaq AlphaServer DS10 or AlphaStation XP900 systems.
Key Information & Steps:
- Purpose: To guide users through the process of installing or replacing memory modules.
- Safety Warnings:
- Access is restricted to technically trained and experienced personnel.
- CPU and memory modules can be hot; wait 2 minutes after power-off before touching.
- Always wear an antistatic wrist strap.
- Installation Overview:
- Shut down the operating system and power down the system.
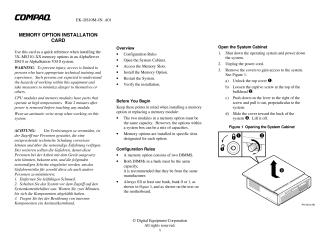
- Open the system cabinet.
- Access memory slots (requires removing the floppy disk drive).
- Install the memory option (two DIMMs per option).
- Restart the system.
- Verify the installation.
- Important Configuration Rules:
- A memory option consists of two DIMMs.
- DIMMs within the same memory bank must be of the same capacity (though different banks can have mixed capacities).
- It is recommended that DIMMs in a bank be from the same manufacturer.
- At least one memory bank (Bank 0 or 1) must be filled.
- Installation Process Highlights:
- Unplug the power cord before opening the cabinet.
- Unlock and remove the system covers.
- Remove the floppy disk drive by pulling its cylinder pins inward and pulling the unit back/up.
- Open the memory connector levers by pushing them down and outward.
- Align and press the DIMM into the connector until the levers close.
- Verification:
- Tru64 UNIX and OpenVMS: At the SRM console prompt, issue the
show memorycommand. - Windows NT: During boot, press F2 to enter AlphaBIOS, then navigate to "Display System" -> "Memory Configuration."
- Tru64 UNIX and OpenVMS: At the SRM console prompt, issue the
Part numbers for options can be found on Compaq's website (URL provided in the document).


Site structure and layout ©2025 Majenko Technologies